Showing posts with label vinyl. Show all posts

Monday, November 4, 2013

Football Challenge

Hey Everybody!  It is time for another Bitten by the Bug 2 challenge!  This week, our leader Susan, has chosen a Football theme.  Our challenge is to create a man project with football in mind.  
Well, I'm from Louisiana, and we are big Louisiana State University fans.  I decided to make my husband a coffee mug to support the Tigers.  I think it came out pretty cute!  
FYI:  "Geaux" is Cajun slang for "Go."  :)
I used Plantin SchoolBook.
I used my gypsy to turn and weld the letters on "Geaux Tigers."
Supplies/Details:
Plantin SchoolBook-LSU cut at 1.18 in.
Plantin SchoolBook-Geaux Tigers -cut at 1 in.
Yellow vinyl

I purchased my vinyl from CricutVinylSupplies.com.  It came in super fast!

If you are intimidated cutting vinyl, don't be!  It's actually easier to work with than paper.  I have another post with detailed pictures on the steps to cutting with vinyl.  

So we hope you join us at Bitten by the Bug 2 for this weeks challenge!!


And if you need an idea for a great Sunday dinner, on my food blog you can check out these Farmer's Pork Chops.
The whole meal bakes up in a casserole dish starting with layers of potatoes and onions, while the pork chops cook on top.  So good!


Wednesday, October 2, 2013

Schoolwork Savers

I wanted to share the school work saver boxes I made for my kiddos.  
I picked up these letter size file boxes at Office Depot.  
I used Plantin Schoolbook for "Olivia."
The circles are also from that cart sized at 1.00 and .75 in.
I used Cuttin Up for "Grant."

Inside I have their school work saved for each year.  I only save some of it or else I'd need a lot more boxes!  I choose to save things with their hand prints, papers that show how they wrote their name, and other special projects and journals.  I plan on putting ALL of their work until they graduate, so I have to be very selective even though it is hard to throw anything.

And if you are in the mood for something comforting as fall approaches, I have a recipe for a Taco Spaghetti Bake over on my food blog:


Monday, September 16, 2013

Vinyl Home Decor Project

I've been wanting to do a monogram with our family name for quite some time now.  I am very pleased with how it came out.  I am entering this project over at Fantabulous Cricut this week.  
Vinyl is so easy!  I did this project and another one (which I'll post in a day or so) in one night!  That was even with two little ones in the room with me!  A pair of scissors and some scrap paper entertained them for quite a while:)  I had it all planned out and the letters welded in my gypsy, so I was able to get right to cutting.

For this project, I used:
8 x 10 canvas
Martha Stewart craft paint
Easel from Michaels
Gypsy Font for the "D" and "Est" and "2002
Accent Essentials for the decorative cut on the bottom
"D" cut at 5 in.
"Est. 2002" cut at 2 in.
Decorative swirl- cut at 3.24 in.
*This was my first time to work with vinyl on a painted canvas surface.  I had a little trouble getting it to stick, and it wanted to bubble up a little.  I thing using a painted wood plaque would be a better option next time.

I'm entering this in the following:
Fantabulous Cricut-ABC's/123's-Use at least 1 letter or number Cricut cut


Saturday, August 10, 2013

Monogrammed Tin Homework Cases

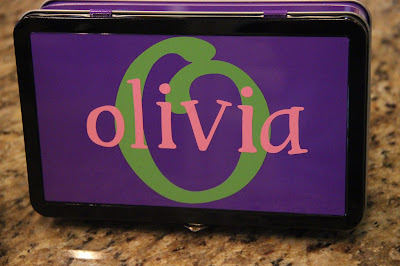
I wanted to share my little project I made for my kids for this school year.  I love when I find something that I can put a vinyl monogram on!!!  I picked up these little tin boxes in the school supply section at Walmart recently.  They were perfect for putting a name on them!  I used my Cricut and the Cricut Craft Room, but you can just as easily use a Silhouette if you have one.
 
These will not be used for school, but they will serve as a "homework box" at home.  Each child will keep their pencils, colors, scissors, glue, etc. in their box.  That way when it is time to sit down and do homework, hopefully we will not waste time trying to find their pencil and colors.  It will all be in one spot much like they have at their desk at school.


I used the Cricut Craft Room instead of my gypsy to get the sizing right.  I had trouble deciding what colors to use on each one.  By using the craft room, I was able to change the colors on the layers and see what combination I liked best and which way the name and the monogram showed up best.  

For the large monogram, I used Lyrical Letters.  They are cut a little over 4 inches.  For the names, I used the Type Candy Font cartridge.  The names are cut at about 1.75 inches.  With the craft room, you are able to just drag the arrow in the lower right corner of the box to adjust the sizing quickly.   For the names, I clicked and dragged to select all the letters.  I then grouped them together by right clicking and selecting "group."  Here are some pictures of the layering with the vinyl:


Overall, it was really simple, and I think they turned out super cute!

I also have another post which shows step-by-step on how to work with the vinyl:


Wednesday, May 1, 2013

Teacher Appreciation Vinyl Projects


I did it!!  I finally created a vinyl project!  I've had rolls of vinyl for two years, and I have never gotten around to creating anything with it.  Shame on me because it was the easiest project I've ever done!  I was so nervous and I watched a lot of tutorials.  Not only was it easy, but it was fast! 


This is what I'm doing for my kids' teachers.    I found the cups at Walmart and the buckets at Dollar Tree.  The clipboards were recently picked up from Office Depot.  As a former teacher, I know teachers love little personalized gifts like these!  See below for specific sizes and cartridges used.


For the clipboards:
I started by welding their names with my Gypsy.  I used Lyrical Letters.  It has the cutest fonts!

This is what it looked like after weeding (peeling) off the vinyl.  


Peel backing off transfer tape.

Place transfer tape sticky side down.  Now you need to burnish it to get it to stick to the transfer tape.  I used my bone folder,  but you could use a credit card too.  

Now peel it making sure it is sticking to the transfer tape.  If it doesn't stick, just burnish it some more.

It will be backwards.

Place it where you want it.  I went ahead and used my bone folder to make sure there were no air bubbles before I peeled off the transfer tape.

For the cups:


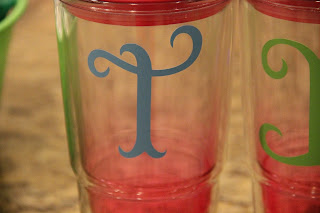
I used a couple of different cartridges for these fonts on the cups.


Storybook cartridge for the "B" and "T"
Beautiful fonts!!
"B" cut at 3.94 in.


"T" cut at 3.82 in.


Gypsy Font for the "M"
Another great font!!
Cut at 3 in.


This was the Lyrical Letters -Loop Dee Loo font cut at 4.79 in.


Overall, this was a super easy project!  I can't wait to do some more vinyl creations!

Here are some of the Teacher Gifts I made last year: